 |
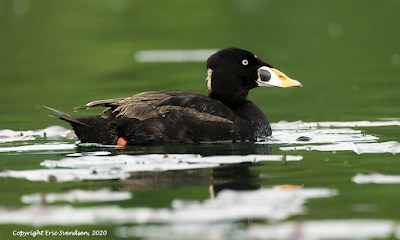
| A male surf scooter floating on Dutch Lake a long way from home. |
I saw a dark coloured bird on the lake's surface two days ago and wondered exactly what it was I was looking at. I can generally place a bird within reason and usually have some idea of what I am looking at. This totally stumped me; I have never seen anything like it.
Today I was out on my kayak and there it was again, this time in a bed of lily pads resting. I had my long lens (150-600 Tamron) handy and got a few good shots of it. Very unusual bill and an odd white spot on the back of its head. Then there were the white eyes with the dark center that really stood out. I had photographed something unusual to be sure.
When I got back to the RV and referenced my bird books (I bring 4 or 5 of them with me when I travel), I discovered I had seen a Surf Scooter. OK, that's a new one to me. I had another look at the texts and they breed far north of here, not too far from the Yukon and NWT borders. Surf Scooters, according to National Geographic's field guide, states that they "nest on the tundra" and are a "rare inland migrant."
Audubon's field guide says that they "stay some distance from shore, taking shellfish, especially muscles." I can tell you that caught my attention. I know there are freshwater clams here because I have seen them. I know certain birds, like seagulls, will collect a clam exposed on tidal flats and drop it from a serious distance onto rocks then greedily downing the splayed contents before competitors can benefit. What about the Surf Scooter?
Have a look at this video. I had to look it up after reading that. They swallow the thing whole, shell and all. It turns out muscles are not its only food; it will take a variety of other invertebrates for food. Rather an amazing discovery.
My guess is that this sea duck is taking a short break before continuing on his journey up north. He will probably be gone in a couple of days, off to find love and bring up a family of his own. I am thankful that I had a chance to see him and learn a little more about this wonderful species.
Thanks for reading.
Eric Svendsen www.ericspix.com


